Battery switch on travel trailer function is crucial for managing your RV’s power. Understanding how these switches work, where they’re located, and how to maintain them is key to safe and reliable operation. This guide covers various switch types, troubleshooting common issues, and ensuring your travel trailer’s electrical system runs smoothly. We’ll explore everything from single-pole to double-pole switches, highlighting their pros and cons to help you make informed decisions about your RV’s electrical setup.
We’ll delve into practical tips for safe operation, including step-by-step instructions and safety precautions. You’ll learn how to identify potential problems, perform basic maintenance, and understand the interplay between your battery switch and other electrical components like solar panels and converters. By the end, you’ll be confident in managing your travel trailer’s power system.
Battery Switch Location and Accessibility: Battery Switch On Travel Trailer Function
Finding your battery switch quickly is crucial, especially in emergencies or when performing routine maintenance. A poorly placed switch can add unnecessary stress and time to an already difficult situation. This section will cover ideal locations and safety considerations for your travel trailer’s battery switch.Knowing where your battery switch is located is vital for both convenience and safety.
Easy access prevents delays in starting your RV or disconnecting the battery in case of an emergency. Conversely, an inaccessible switch can lead to wasted time and potential hazards.
So, you’re prepping for your awesome travel trailer adventure? First things first: understanding your power! Check out this guide on the battery switch on travel trailer function to avoid any dead-battery surprises. Knowing how that works is key, and once you’ve got that sorted, it’s time to think about insurance. Securing your trip with Aon travel insurance gives you peace of mind, letting you focus on the fun stuff – like exploring amazing destinations!
Typical Battery Switch Locations
Battery switches are typically found in one of several locations on a travel trailer. Common spots include near the batteries themselves, often inside an exterior compartment; inside a dedicated electrical bay; or sometimes even near the tongue, close to the main power hookup. However, the exact location varies widely depending on the manufacturer and model of your travel trailer.
Some manufacturers might even place it inside a storage compartment that’s difficult to access, which should be avoided.
Importance of Accessibility
Easy access to the battery switch is paramount for several reasons. Firstly, during routine maintenance, like checking battery levels or disconnecting for storage, a readily accessible switch significantly speeds up the process. Secondly, and more importantly, in emergency situations, such as a fire or electrical short, quickly disconnecting the battery is critical to safety. A hard-to-reach switch can delay this crucial step, potentially increasing the risk of damage or injury.
Finally, accessibility simplifies troubleshooting electrical issues. Easily turning the switch off and on can help determine if a problem originates with the battery or elsewhere in the electrical system.
Safety Considerations for Battery Switch Placement
Safety is the top priority when considering battery switch placement. The switch should be located away from any potential sources of ignition, such as propane tanks or fuel lines. It should also be positioned to minimize the risk of accidental contact with water or moisture, which can cause short circuits or electrical shock. Furthermore, ensure the area around the switch is well-lit and provides sufficient space for safe operation.
The switch itself should be clearly labeled and easily identifiable.
Optimal Battery Switch Placement Diagram
Imagine a simplified diagram of a travel trailer’s exterior. The diagram shows the propane tank located at the rear left corner. The battery compartment is depicted on the rear right corner, clearly marked and accessible. The battery switch is located on the exterior wall of the battery compartment, but slightly recessed and protected by a weatherproof cover. It is easily visible and within arm’s reach without having to reach over or around other components.
So, you’re prepping for your awesome RV trip? First things first: understanding your travel trailer’s power system is key. Check out this guide on the battery switch on travel trailer function to avoid any dead-battery surprises. Then, don’t forget travel insurance! Securing your trip with Aon travel insurance gives you peace of mind knowing you’re covered in case of unexpected hiccups.
This ensures your adventure stays fun and worry-free.
This placement ensures easy access for maintenance and emergencies while keeping it away from potential hazards. A clear label indicating its function (“Battery Disconnect”) is prominently displayed on the cover. The space around the switch allows for safe and comfortable operation without risk of accidental contact with other parts of the trailer. Wiring leading to the switch is neatly routed and secured to prevent accidental damage or entanglement.
Operating the Battery Switch
Knowing how to safely operate your travel trailer’s battery switch is crucial for preventing damage to your appliances and avoiding electrical hazards. This section details the proper procedure and emphasizes the importance of safety precautions. Improper handling can lead to serious consequences, so careful attention to detail is essential.
Operating a typical travel trailer battery switch is straightforward, but requires a methodical approach. The switch itself usually has two positions: ON and OFF. Some models might include a third position for a dedicated battery charger, but the core principle remains the same: controlling the flow of power to your trailer’s electrical system.
Safe Operation Procedure
Follow these steps to safely operate your battery switch. Always double-check the switch’s position before and after each operation.
- Locate the battery switch. (This location has already been covered.)
- Before turning the switch, visually inspect the switch and its surrounding area for any signs of damage, loose connections, or corrosion. If you observe any issues, do not operate the switch and seek professional assistance.
- To turn the power ON, rotate the switch to the “ON” position. You should hear a distinct click.
- To turn the power OFF, rotate the switch to the “OFF” position. Again, a click should confirm the change.
- After turning the switch OFF, wait a few moments to ensure the electrical system has fully de-energized before undertaking any maintenance or repairs.
Preventing Accidental Disconnection or Incorrect Switching
Accidental disconnection or incorrect switching can lead to inconvenience and potential damage. Proper labeling and careful handling are key to preventing these issues.
- Clearly label the switch with “ON” and “OFF” markings. Use a permanent marker if necessary.
- Avoid placing the switch in a location where it could be accidentally bumped or knocked. Consider using a protective cover if the switch is in a vulnerable position.
- If possible, use a switch with a locking mechanism to prevent accidental changes. This is especially useful if children have access to the switch.
- Develop a habit of visually confirming the switch position before and after each use. This simple practice significantly reduces the risk of errors.
Consequences of Improper Battery Switch Operation
Incorrect operation of the battery switch can have several negative consequences. Understanding these risks helps emphasize the importance of following the proper procedures.
- Damage to Appliances: Suddenly switching power on or off can damage sensitive electronic appliances, such as televisions or refrigerators. This could lead to costly repairs or replacements.
- Electrical Hazards: Improperly operated switches can create electrical hazards, such as short circuits or arcing. These hazards can potentially cause fires or injuries.
- Battery Damage: Repeatedly switching the battery on and off without allowing the system to stabilize can put excessive strain on the battery, reducing its lifespan and potentially damaging it.
Safety Precautions
Prioritizing safety is paramount when operating the battery switch. Always follow these precautions to minimize the risks involved.
- Always turn the switch OFF before performing any maintenance or repairs on the electrical system.
- Never touch the switch with wet hands.
- If you encounter any problems with the switch, consult a qualified electrician before attempting any repairs yourself.
- Keep the area around the battery switch clean and free of debris.
- Supervise children in the vicinity of the battery switch.
Troubleshooting Common Battery Switch Issues
Your travel trailer’s battery switch is a critical component, ensuring power to your appliances and systems. Problems with this switch can leave you stranded without power, so understanding how to troubleshoot issues is essential for a smooth camping experience. This section will guide you through identifying and resolving common battery switch problems.
Common problems with travel trailer battery switches usually stem from wear and tear, exposure to the elements, or simple user error. Corrosion, loose connections, and eventual switch failure are the most frequently encountered issues. These problems can manifest as a complete lack of power, intermittent power failures, or even overheating of the switch itself.
Visual Inspection of the Battery Switch
Before attempting any repairs, a thorough visual inspection is crucial. Start by carefully examining the switch itself for any obvious signs of damage. Look for:
- Corrosion: Check for white, green, or blue powdery residue on the terminals or the switch housing. Corrosion acts as an insulator, preventing proper electrical contact.
- Loose Connections: Inspect the wires connected to the switch. Ensure they are securely fastened and that the terminals are clean and tight. Loose connections can lead to intermittent power or complete failure.
- Physical Damage: Look for cracks, breaks, or any other signs of physical damage to the switch housing or its internal components. A damaged switch will likely need replacement.
- Overheating: Feel the switch housing (carefully!) to check for excessive heat. Overheating is a sign of a problem, potentially a short circuit or a high-resistance connection.
A visual inspection often reveals the root cause of the problem. If you find corrosion, loose connections, or damage, you can proceed with the appropriate repair or replacement.
Troubleshooting Steps for a Non-Functional Battery Switch
If your battery switch isn’t working, follow these steps to diagnose the issue:
A systematic approach is key to efficiently identifying the problem. Start with the simplest checks and progress to more complex troubleshooting steps if necessary.
The following flowchart visually represents the troubleshooting process:
Flowchart:
Start -> Visual Inspection (Corrosion, Loose Connections, Physical Damage) -> YES (to any of above) -> Clean/Tighten Connections or Replace Switch -> Test -> Working? YES (End) NO (End) -> NO (to any of above) -> Check Battery and Wiring to Switch -> Battery OK and Wiring Secure? YES -> Check Switch Continuity (with multimeter) -> Switch Shows Continuity?
YES -> Problem likely elsewhere in system -> NO -> Replace Switch -> Test -> Working? YES (End) NO (End)
Note: Using a multimeter to check continuity requires basic electrical knowledge. If you are uncomfortable performing this test, consult a qualified electrician.
Battery Switch and Electrical System Integration
The battery switch is the central control point for your travel trailer’s DC power system, acting as a gatekeeper for the flow of electricity from your batteries to the various appliances and systems. Understanding its interaction with other components is crucial for safe and efficient power management. This section details how the battery switch integrates with the rest of your RV’s electrical system.The battery switch’s primary function is to connect or disconnect your batteries from the rest of the electrical system.
This allows you to isolate your batteries to prevent unwanted discharge when the trailer is not in use or to troubleshoot electrical problems. It manages the power flow between your battery bank(s) and the various DC loads in your RV, such as lights, water pump, and refrigerator (if it runs on 12V DC). When the switch is “on,” current flows from the battery to the appliances; when “off,” the circuit is broken.
Power Flow with Solar Panels
Solar panels, if installed, usually charge the batteries directly. The battery switch doesn’t directly control the flow of power
- from* the solar panels, but it does control the flow of power
- from* the batteries to the appliances. Even with the battery switch off, solar panels will continue to charge the batteries (unless a separate solar charge controller has a switch that interrupts the charging process).
Power Flow with Converter
The converter changes incoming AC power (from shore power or a generator) into DC power to charge the batteries and power some 12V DC appliances. The battery switch controls the path of the DC power
- from* the batteries, not the AC power
- to* the converter. The converter usually has its own internal circuitry to manage charging and power distribution. In essence, the battery switch and the converter work independently but within the same electrical system.
Power Flow with Shore Power, Battery switch on travel trailer function
Shore power provides AC electricity to the RV. The battery switch does not directly interact with the shore power input. The shore power connects to the converter, which then manages the charging of the batteries and the powering of AC appliances. The battery switch only controls the DC power originating from the batteries themselves.
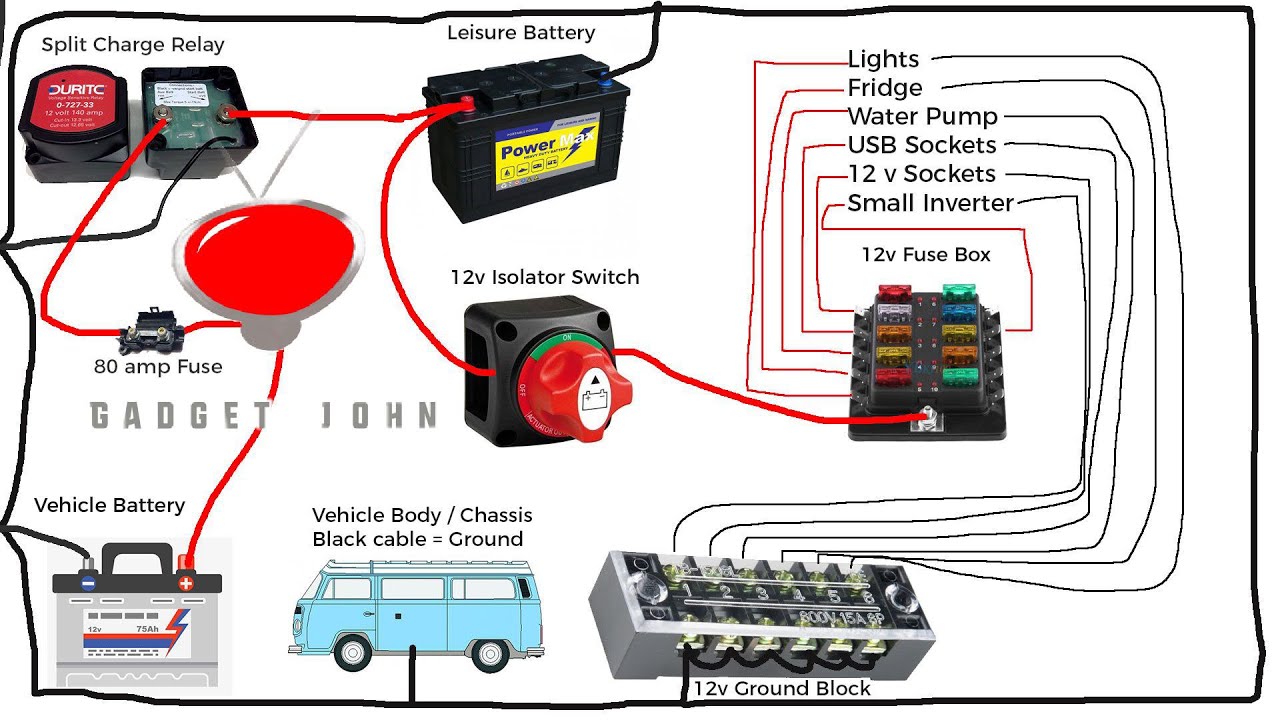
Battery Switch in Systems with Multiple Batteries
In trailers with both a house battery and a chassis battery, the battery switch often manages the house battery. The chassis battery, typically used for starting the vehicle’s engine, usually has its own separate connection and is not controlled by the house battery switch. This prevents accidental draining of the starting battery. A dual-battery setup provides redundancy and sufficient power for various onboard systems.
For example, a deep-cycle house battery powers the lights and appliances, while a smaller, high-cranking chassis battery powers the engine. The battery switch only controls the flow from the house battery.
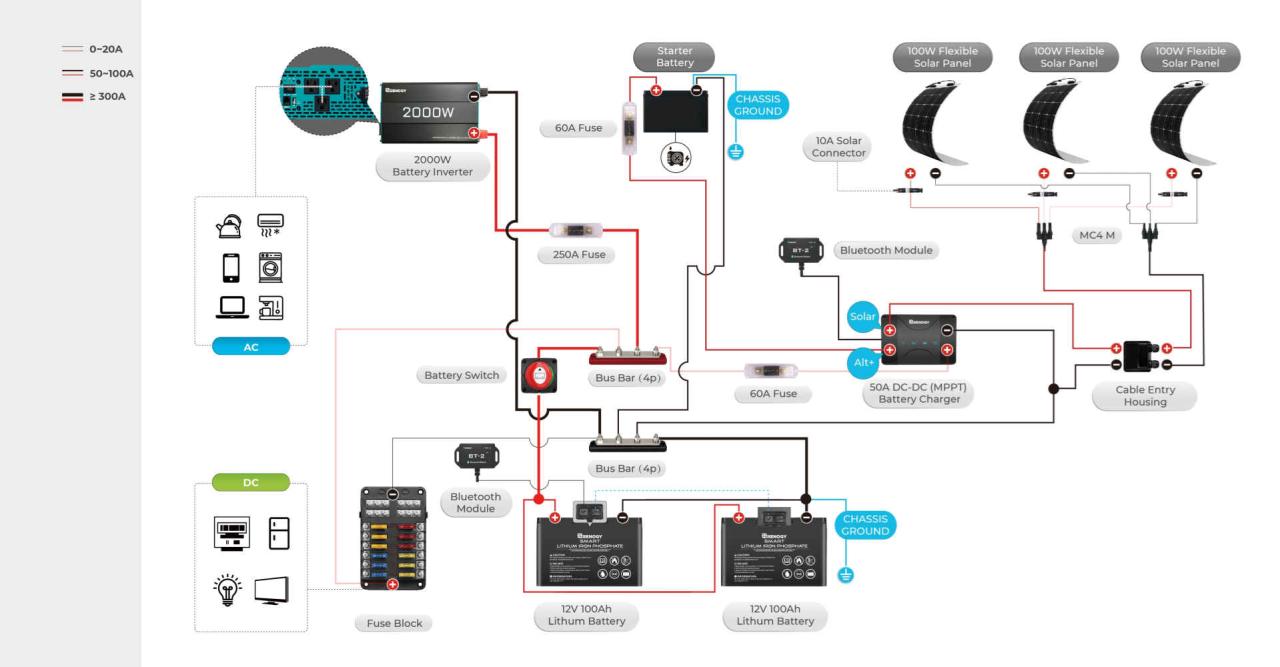
Simplified Schematic Diagram
Imagine a simple diagram. At the top, you have a symbol representing your batteries (two parallel lines, longer line representing the positive terminal). A line from the positive terminal connects to the battery switch (represented by a simple switch symbol). From the battery switch, lines branch out to represent different loads (lights, water pump, etc.), each with a simple load symbol (resistor).
Another line from the switch connects to the negative terminal of the batteries. Separate lines represent the solar panel charging the batteries and the converter charging the batteries. The converter receives AC input from shore power (represented by a wall outlet symbol) and outputs DC power to charge the batteries. Crucially, the converter’s charging path and the loads’ paths are connected after the battery switch.
This shows that the switch controls the output of the batteries, not the input to the batteries.
Mastering your travel trailer’s battery switch is a simple yet powerful step towards ensuring safe and enjoyable RV adventures. From understanding the different switch types to performing basic maintenance, this guide provides the knowledge you need to confidently manage your trailer’s electrical system. Remember, regular inspection and proper operation are key to preventing problems and maximizing the lifespan of your battery switch and your entire electrical system.
Happy travels!
Clarifying Questions
What happens if I leave my battery switch on all the time?
Leaving your battery switch on constantly can drain your batteries, especially if you’re not using shore power or have a faulty converter. It’s best practice to turn it off when not in use to conserve battery life.
Can I install a battery switch myself?
While possible, installing a battery switch yourself requires basic electrical knowledge and caution. Incorrect installation can lead to electrical hazards. It’s often best to consult a professional for installation.
How often should I clean my battery switch?
Inspect and clean your battery switch at least twice a year, or more often if you notice corrosion or other issues. A simple cleaning with a wire brush and baking soda paste can help prevent corrosion.
What size battery switch do I need?
The appropriate size of your battery switch depends on the amperage of your battery system. Consult your RV’s electrical system documentation or a qualified electrician to determine the correct size.
